Shopify POS: Inventory lookup by Locations
Inventory lookup by Locations
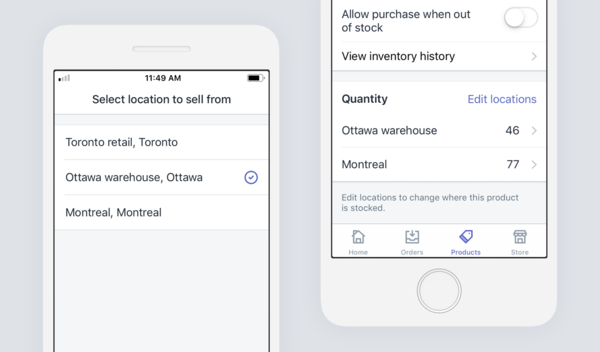
Within a product’s details you can now view inventory levels across multiple other locations, including inventory levels at your custom fulfillment service or third-party shipping service, if applicable. This is a major improvement, increasing POS’s ability to service larger multi-location retail merchants.
Select a Shopify POS location
You can change the location that is set on your Shopify POS device.
Steps:
- From Shopify POS, tap Store, and then tap Locations.
- If your location is not on the list, then tap Add or edit your locations to create a new location.
- Tap a location, and then tap Switch.
See a product's details
To view a product's details, tap and hold the product's image in the products grid.
The product details include the following information:
- product SKU
- description
- product type
- vendor
- any upcoming inventory transfers
- available variants
- current location's inventory levels
- inventory levels at your other locations, if applicable
- inventory levels at your custom fulfillment service or third-party shipping service, if applicable
Refund an entire order
You can refund orders from the Orders screen of Shopify POS. When you refund an order, you can make sure that your inventory levels are correct by restocking returned products. Restocked products are assigned to the inventory of the Shopify POS app's assigned location.
Steps:
- From the Orders screen, tap the order that you want to refund.
- Tap Refund products.
- Use the
+and-beside each product to enter the quantity that you're refunding. - If you don't want to return the items to your inventory, then disable the Restock option.
- To refund the cost of shipping, tap Add beside Shipping.
- If the customer used more than one payment method, then you can split the refund between the same payment methods that they used. Enter the amount that you want to refund to each payment method in the Refund amount section.
- Optional: Tap Add reason for return, to add a reason for the return.
- When you're ready to process the refund, tap Refund.
- If the customer paid with cash or an external payment provider, then follow the on-screen prompts and tap Continue.
- If you want to email or text a confirmation receipt to the customer, then tap Email receipt or Text receipt on the Refund successful screen.
- After the refund is processed, tap Done to return to the order details screen.
Limit the location permissions of staff
If you want to limit your staff with POS PINs from accessing your locations settings and viewing orders made at other locations, then you can set limited staff permissions.